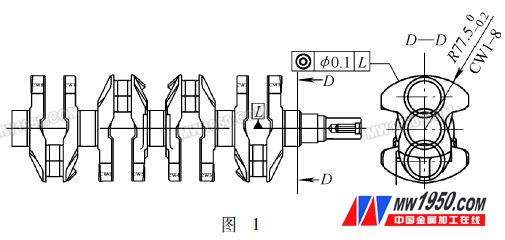
The crankshaft is the core part of the engine, which is not only complicated in structure, but also has high processing precision and processing difficulty. Among them, the dimensional accuracy and positional accuracy of the crank weight are shown in Figure 1. The dimensional accuracy of the weight is 5.77 mm, the tolerance is 0.2 mm, and the coaxiality with the center of the radius of the spindle is 0.1 mm. Generally, the method for detecting the radius of gyration of the weight is usually taken after the positive crankshaft is used, the height a value of the weight is measured by the height gauge, the a' value of the crankshaft height is measured, and the crankshaft radius R value is measured by the micrometer. Calculate the radius of gyration e'=(a-a')+R, and then calculate the difference from the theoretical value e to evaluate whether the workpiece is qualified, that is, -e-eˊ-≤0.2. The accuracy of this method for measuring the radius of gyration of the crankshaft counterweight is reliable and can meet the measurement requirements. However, this detection method needs to detect 8 positions separately, and the detection time is long, which cannot meet the needs of pipeline production.

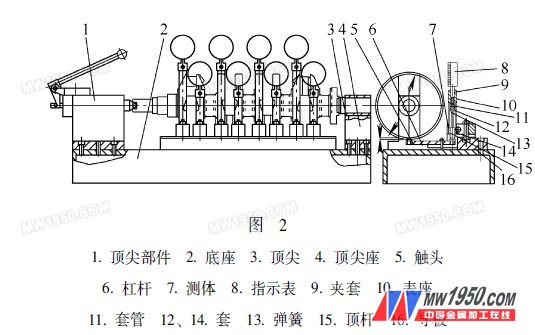
In order to ensure the processing capacity of the production line, according to the dimensional accuracy and shape tolerance requirements of the product, under the premise of ensuring the measurement accuracy, the detection time is shortened and the detection efficiency is improved. Therefore, we have designed a set of measuring radius of gyration of the weight. Dedicated Gage. The gauge adopts the comparative measurement method, and the standard part is used as the reference. The repeatability error of the table is 0.01 mm, and the special inspection tool is shown in Fig. 2.

1. Design of the inspection tool
(1) Design of the positioning device and clamping device of the inspection tool Designing the inspection tool, it is necessary to ensure flexible operation, convenient clamping, accurate positioning, and measurement accuracy. Therefore, the design positioning reference of the inspection tool is consistent with the production processing positioning reference, which can reduce the error caused by the difference of the reference. The gauge positioning is based on the two central holes of the crankshaft, the fixed end is used at the big end, the movable tip is used at the small end, and the crankshaft is positioned by the two tips. In use, firstly, the crankshaft pair watch is mounted on the two top ends of the gage, the center of the watch is coincident with the center of the two tips, and then the crankshaft pair is rotated to make the outer diameter of the watch contact with the contact 5. Through the 1:1 transmission of the lever 6, the ejector pin 15 is driven to push the indicator head, and when the indicator pointer reaches the maximum value, the pointer is set to 0 position. After that, the workpiece of the tested crankshaft is mounted on a special inspection tool, and the corresponding dimensional deviation of the weight to be tested is read from the indicator table.
(2) Design of the accuracy of the watch The measurement method adopted by the gage is the comparative measurement method, which is based on the standard parts. Therefore, in order to ensure the measurement accuracy of the gage, the accuracy of the standard parts must be strictly controlled, according to the crankshaft. The tolerance of the weight of the weight of the block is 0.2mm, and one-tenth of the tolerance of the gauge to the accuracy of the watch is reasonable, that is, ±0.01mm, and the measurement accuracy of the special gauge is ±0.02mm.
(3) Guarantee of measurement accuracy The gage device is used to detect the radius of gyration radius of all 8 weights, so it can be analyzed from there, there are three main factors affecting the measurement accuracy: the error of the two coaxial concentricity, standard The error of the accuracy of the piece indicates the error of the table. In order to ensure the coaxiality error of the two top points, coincide with the center of the crankshaft, in order to reduce the difficulty of machining, in consideration of the existing process capability, the inspector and the fitter cooperate to adjust the positional accuracy of the two tips by using the grinding to make two After the tip reaches the requirement of coaxiality φ0.01mm, the hinge hole is finally drilled and positioned by the positioning pin. For the accuracy of the control standard parts, in the assembly stage of the standard parts, after assembling 8 standard blocks, they are installed on the two top points, and the eight standard blocks are respectively adjusted, so that the consistency of each standard block is controlled at 0.01 mm. . For the indicator table, the self-reproducibility of the indicator table is 0.003 mm, and the indication error within ±0.05 mm is 0.005 mm. Under the premise of ensuring the technical requirements of the measuring device, the repeatability of the indication value of the measuring device can be satisfied. Mm, the indication error within ±0.05 mm is 0.01 mm. By adjusting and repairing the fitter during assembly, the machining process can be greatly simplified, the processing difficulty can be reduced, the technical requirements of the design can be ensured, and the measurement accuracy of the inspection tool can be satisfied.
2. How to use the test tool
(1) Mount the standard part on the inspection tool, rotate the standard part to make the radius of gyration reach the highest point, and the indicator will be 0-position.
(2) Mount the workpiece of the crankshaft to be tested on the gage.
(3) Rotating the crankshaft to detect the radius of gyration of the counterweight, and read the corresponding maximum numerical deviation on the eight indicator tables, and the deviation is within the tolerance range.
3. Conclusion
After the actual measurement and use verification on site, the special tool is used to measure the radius of gyration of the crankshaft weight, which can conveniently and quickly measure the error of the radius of gyration, and can ensure sufficient measurement accuracy and improve the detection efficiency of the radius of gyration of the weight. The dimensional accuracy of all 8 weights of the crankshaft parts can be detected within 3 minutes, which meets the actual needs of production and is compatible with the production and processing capabilities.
Here you can find the related products in Dissolved Oxygen Meter, we are professional manufacturer of Dissolved Oxygen Meter,Dissolved Oxygen Tester,Portable Dissolved Oxygen Meter,Dissolved O2 Meter. We focused on international export product development, production and sales. We have improved quality control processes of Dissolved Oxygen Meter to ensure each export qualified product.
If you want to know more about the products in Dissolved Oxygen Meter, please click the product details to view parameters, models, pictures, prices and other information about Dissolved Oxygen Meter,Dissolved Oxygen Tester,Portable Dissolved Oxygen Meter,Dissolved O2 Meter.
Whatever you are a group or individual, we will do our best to provide you with accurate and comprehensive message about Dissolved Oxygen Meter!
Dissolved Oxygen Meter,Dissolved Oxygen Tester,Portable Dissolved Oxygen Meter,Dissolved O2 Meter
Xi'an Gavin Electronic Technology Co., Ltd , https://www.gaimc-meas.com