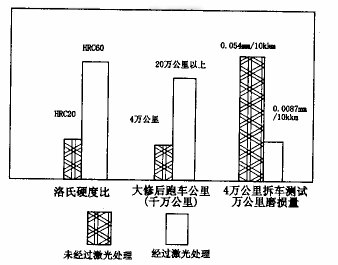
Figure 1 Comparison of car sports car data
(2) Crankshaft wear before and after 600h bench test
According to QC/T524-1999 "Automotive engine performance test method", QC/T525-1999 "Automotive engine reliability test method" and other standards, the laser heat-treated crankshaft is mounted on the 492QA gasoline engine, full-speed full-load reliability test. After 600h bench test, precision measurement was carried out, and the wear amount is shown in the table.
The amount of journal wear before and after the 600h test

The test proves that the laser surface treated crankshaft has good wear resistance after 600h bench test, and its maximum wear amount is 0.02mm, which meets the requirements of national regulations and can meet the 2×10⁵km overhaul period standard.
4 computer control principle
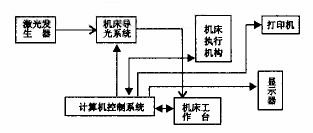
This project selects PC bus industrial control machine as control machine and CRT as display. Therefore, a better user interface can be achieved and the control function is stronger. The principle is shown in Figure 2.

Figure 2 Engine surface hardening computer control schematic
For the reliability of the system, the strong and weak parts are connected by the optical isolator. The direction of the arrow in the figure indicates the flow of the control information, and the stroke switches are connected to the I/O board in parallel, so as long as the position is detected in one direction, Causes the machine to stop light.
The programming language adopts C++ and 80386 assembly language, and the programming uses analogy linear interpolation method. Due to space limitations, this article does not explain.
It must be emphasized that before the heat treatment of the engine block and other parts, the workpiece must be pre-rotated first, and after the light is turned off, there must be a period of rotation. Otherwise, the workpiece will be partially burned.
5 Conclusion
The engine is the heart of the car. The engine after laser surface hardening is generally improved from the original 20HRC to 55-62HRC, and the depth of reinforcement is 0.2~1mm. The service life is increased to 3~5 times, and the heat treatment cost is reduced. From 20% to 40%, the workpiece after laser heat treatment has almost no deformation. Therefore, it not only prolongs the overhaul cycle, but also saves the cost of repeated maintenance, has good social and economic benefits, and has broad application prospects.
Previous page
Aluminum Alloy Handle,Aluminum Alloy Door Handle,Hardware Wire Drawing Handle,Interior Door Handle
Guangzhou Junpai Hardware Co., Ltd , https://www.junpaihardware.com